CephFS 快速入门
开始实践 Ceph 文件系统入门前,必须先完成存储集群入门。在管理节点上完成此入门。
准备工作
确认下你的内核版本没问题,详情见操作系统推荐。
lsb_release -a
uname -r
在管理节点上,用
ceph-deploy把 Ceph 安装到ceph-client节点上。ceph-deploy install ceph-client
Optionally, if you want a FUSE-mounted file system, you would need to install
ceph-fusepackage as well.确保 Ceph 存储集群在运行,且在
active + clean状态。ceph -s [-m {monitor-ip-address}] [-k {path/to/ceph.client.admin.keyring}]
Deploy Metadata Server
All metadata operations in CephFS happen via a metadata server, so you need at least one metadata server. Execute the following to create a metadata server:
ceph-deploy mds create {ceph-node}
For example:
ceph-deploy mds create node1
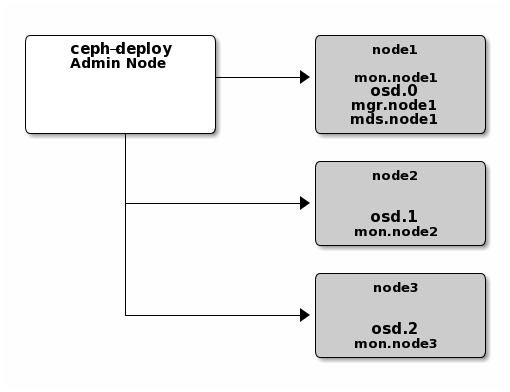
Now, your Ceph cluster would look like this:
创建文件系统
你虽然已创建元数据服务器(存储集群入门),但如果你没有创建存储池和文件系统的话它是不会活动的,参见 创建 Ceph 文件系统 。
ceph osd pool create cephfs_data 32
ceph osd pool create cephfs_meta 32
ceph fs new mycephfs cephfs_meta cephfs_data
Note
In case you have multiple Ceph applications and/or have multiple CephFSs on the same cluster, it would be easier to name your pools as <application>.<fs-name>.<pool-name>. In that case, the above pools would be named as cephfs.mycehfs.data and cephfs.mycehfs.meta.
Quick word about Pools and PGs
Replication Number/Pool Size
Since the default replication number/size is 3, you’d need 3 OSDs to get
active+clean for all PGs. Alternatively, you may change the replication
number for the pool to match the number of OSDs:
ceph osd pool set cephfs_data size {number-of-osds}
ceph osd pool set cephfs_meta size {number-of-osds}
Usually, setting pg_num to 32 gives a perfectly healthy cluster. To pick
appropriate value for pg_num, refer Placement Group. You can also use
pg_autoscaler plugin instead. Introduced by Nautilus release, it can
automatically increase/decrease value of pg_num; refer the
Placement Group to find out more about it.
When all OSDs are on the same node…
And, in case you have deployed all of the OSDs on the same node, you would need to create a new CRUSH rule to replicate data across OSDs and set the rule on the CephFS pools, since the default CRUSH rule is to replicate data across different nodes:
ceph osd crush rule create-replicated rule_foo default osd
ceph osd pool set cephfs_data crush_rule rule_foo
ceph osd pool set cephfs_meta crush_rule rule_foo
Using Erasure Coded pools
You may also use Erasure Coded pools which can be more effecient and cost-saving since they allow stripping object data across OSDs and replicating these stripes with encoded redundancy information. The number of OSDs across which the data is stripped is k and number of replica is m. You’ll need to pick up these values before creating CephFS pools. The following commands create a erasure code profile, creates a pool that’ll use it and then enables it on the pool:
ceph osd erasure-code-profile set ec-42-profile k=4 m=2 crush-failure-domain=host crush-device-class=ssd
ceph osd pool create cephfs_data_ec42 64 erasure ec-42-profile
ceph osd pool set cephfs_data_ec42 allow_ec_overwrites true
ceph fs add_data_pool mycephfs cephfs_data_ec42
You can also mark directories so that they are only stored on certain pools:
setfattr -n ceph.dir.layout -v pool=cephfs_data_ec42 /mnt/mycephfs/logs
This way you can choose the replication strategy for each directory on your Ceph file system.
Note
Erasure Coded pools can not be used for CephFS metadata pools.
Erasure coded pool were introduced in Firefly and could be used directly by CephFS Luminous onwards. Refer this article by Sage Weil to understand EC, it’s background, limitations and other details in Ceph’s context. Read more about Erasure Code here.
Mounting the File System
用内核驱动
The command to mount CephFS using kernel driver looks like this:
sudo mount -t ceph :{path-to-mounted} {mount-point} -o name={user-name}
sudo mount -t ceph :/ /mnt/mycephfs -o name=admin   # usable version
{path-to-be-mounted} is the path within CephFS that will be mounted,
{mount-point} is the point in your file system upon which CephFS will be
mounted and {user-name} is the name of CephX user that has the
authorization to mount CephFS on the machine. Following command is the
extended form, however these extra details are automatically figured out by
by the mount.ceph helper program:
sudo mount -t ceph {ip-address-of-MON}:{port-number-of-MON}:{path-to-be-mounted} -o name={user-name},secret={secret-key} {mount-point}
If you have multiple file systems on your cluster you would need to pass
fs={fs-name} option to -o option to the mount command:
sudo mount -t ceph :/ /mnt/kcephfs2 -o name=admin,fs=mycephfs2
Refer mount.ceph man page and Mount CephFS using Kernel Driver to read more about this.
用 FUSE
To mount CephFS using FUSE (Filesystem in User Space) run:
sudo ceph-fuse /mnt/mycephfs
To mount a particular directory within CephFS you can use -r:
sudo ceph-fuse -r {path-to-be-mounted} /mnt/mycephfs
If you have multiple file systems on your cluster you would need to pass
--client_fs {fs-name} to the ceph-fuse command:
sudo ceph-fuse /mnt/mycephfs2 --client_fs mycephfs2
Refer ceph-fuse man page and Mount CephFS using FUSE to read more about this.
Note
Mount the CephFS file system on the admin node, not the server node.