基本工作流
The following chart illustrates basic development workflow:
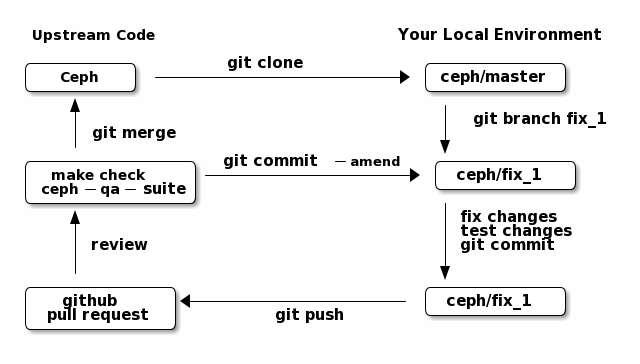
Below we present an explanation of this chart. The explanation is written with the assumption that you, the reader, are a beginning developer who has an idea for a bugfix, but do not know exactly how to proceed. Watch the Getting Started with Ceph Development video for a practical summary of the same.
更新追踪器
Before you start, you should know the Issue tracker number of the bug you intend to fix. If there is no tracker issue, now is the time to create one.
The tracker is there to explain the issue (bug) to your fellow Ceph developers and keep them informed as you make progress toward resolution. To this end, then, provide a descriptive title as well as sufficient information and details in the description.
If you have sufficient tracker permissions, assign the bug to yourself by
changing the Assignee field. If your tracker permissions have not yet
been elevated, simply add a comment to the issue with a short message like
“I am working on this issue”.
上游源码
This section, and the ones that follow, correspond to the nodes in the above chart.
The upstream code lives in https://github.com/ceph/ceph.git, which is sometimes referred to as the “upstream repo”, or simply “upstream”. As the chart illustrates, we will make a local copy of this code, modify it, test our modifications, and submit the modifications back to the upstream repo for review.
A local copy of the upstream code is made by
forking the upstream repo on GitHub, and
cloning your fork to make a local working copy
See the the GitHub documentation for detailed instructions on forking. In short, if your GitHub username is “mygithubaccount”, your fork of the upstream repo will show up at https://github.com/mygithubaccount/ceph. Once you have created your fork, you clone it by doing:
$ git clone https://github.com/mygithubaccount/ceph
While it is possible to clone the upstream repo directly, in this case you must fork it first. Forking is what enables us to open a GitHub 拉取请求。
For more information on using GitHub, refer to GitHub Help.
本地环境
In the local environment created in the previous step, you now have a
copy of the master branch in remotes/origin/master. Since the fork
(https://github.com/mygithubaccount/ceph.git) is frozen in time and the
upstream repo (https://github.com/ceph/ceph.git, typically abbreviated to
ceph/ceph.git) is updated frequently by other developers, you will need
to sync your fork periodically. To do this, first add the upstream repo as
a “remote” and fetch it:
$ git remote add ceph https://github.com/ceph/ceph.git
$ git fetch ceph
Fetching downloads all objects (commits, branches) that were added since
the last sync. After running these commands, all the branches from
ceph/ceph.git are downloaded to the local git repo as
remotes/ceph/$BRANCH_NAME and can be referenced as
ceph/$BRANCH_NAME in certain git commands.
For example, your local master branch can be reset to the upstream Ceph
master branch by doing:
$ git fetch ceph
$ git checkout master
$ git reset --hard ceph/master
Finally, the master branch of your fork can then be synced to upstream
master by:
$ git push -u origin master
缺陷修订分支
Next, create a branch for the bugfix:
$ git checkout master
$ git checkout -b fix_1
$ git push -u origin fix_1
This creates a fix_1 branch locally and in our GitHub fork. At this
point, the fix_1 branch is identical to the master branch, but not
for long! You are now ready to modify the code.
在本地修正缺陷
At this point, change the status of the tracker issue to “In progress” to communicate to the other Ceph developers that you have begun working on a fix. If you don’t have permission to change that field, your comment that you are working on the issue is sufficient.
Possibly, your fix is very simple and requires only minimal testing. More likely, it will be an iterative process involving trial and error, not to mention skill. An explanation of how to fix bugs is beyond the scope of this document. Instead, we focus on the mechanics of the process in the context of the Ceph project.
A detailed discussion of the tools available for validating your bugfixes, see the chapters on testing.
For now, let us just assume that you have finished work on the bugfix and
that you have tested it and believe it works. Commit the changes to your local
branch using the --signoff option:
$ git commit -as
and push the changes to your fork:
$ git push origin fix_1
GitHub 拉取请求
The next step is to open a GitHub pull request. The purpose of this step is to make your bugfix available to the community of Ceph developers. They will review it and may do additional testing on it.
In short, this is the point where you “go public” with your modifications. Psychologically, you should be prepared to receive suggestions and constructive criticism. Don’t worry! In our experience, the Ceph project is a friendly place!
If you are uncertain how to use pull requests, you may read this GitHub pull request tutorial.
For some ideas on what constitutes a “good” pull request, see the Git 提交的实践真知 article at the OpenStack 项目百科.
Once your pull request (PR) is opened, update the Issue tracker by adding a comment to the bug pointing the other developers to your PR. The update can be as simple as:
*PR*: https://github.com/ceph/ceph/pull/$NUMBER_OF_YOUR_PULL_REQUEST
全自动的 PR 校验
When your PR hits GitHub, the Ceph project’s Continuous Integration (CI) infrastructure will test it automatically. At the time of this writing (March 2016), the automated CI testing included a test to check that the commits in the PR are properly signed (see Submitting patches) and a make check test.
The latter, make check, builds the PR and runs it through a battery of tests. These tests run on machines operated by the Ceph Continuous Integration (CI) team. When the tests complete, the result will be shown on GitHub in the pull request itself.
You can (and should) also test your modifications before you open a PR. Refer to the chapters on testing for details.
PR make check 测试注意事项
GitHub 上的 make check 测试是由 Jenkins 例程驱动的。
Jenkins merges the PR branch into the latest version of the base branch before starting the build, so you don’t have to rebase the PR to pick up any fixes.
You can trigger the PR tests at any time by adding a comment to the PR - the comment should contain the string “test this please”. Since a human subscribed to the PR might interpret that as a request for him or her to test the PR, it’s good to write the request as “Jenkins, test this please”.
The make check log is the place to go if there is a failure and you’re not sure what caused it. To reach it, first click on “details” (next to the make check test in the PR) to get into the Jenkins web GUI, and then click on “Console Output” (on the left).
Jenkins is set up to grep the log for strings known to have been associated with make check failures in the past. However, there is no guarantee that the strings are associated with any given make check failure. You have to dig into the log to be sure.
集成测试(也就是 ceph-qa-suite )
Since Ceph is a complex beast, it may also be necessary to test your fix to see how it behaves on real clusters running either on real or virtual hardware. Tests designed for this purpose live in the ceph/qa sub-directory and are run via the teuthology framework.
The Ceph community has access to the Sepia lab where integration tests can be run on real hardware. Other developers may add tags like “needs-qa” to your PR. This allows PRs that need testing to be merged into a single branch and tested all at the same time. Since teuthology suites can take hours (even days in some cases) to run, this can save a lot of time.
To request access to the Sepia lab, start here.
Integration testing is discussed in more detail in the integration testing chapter.
源码审核
Once your bugfix has been thoroughly tested, or even during this process, it will be subjected to code review by other developers. This typically takes the form of correspondence in the PR itself, but can be supplemented by discussions on IRC and the Mailing list.
修订你的 PR
While your PR is going through testing and 源码审核, you can modify it at any time by editing files in your local branch.
After the changes are committed locally (to the fix_1 branch in our
example), they need to be pushed to GitHub so they appear in the PR.
Modifying the PR is done by adding commits to the fix_1 branch upon
which it is based, often followed by rebasing to modify the branch’s git
history. See this tutorial for a good
introduction to rebasing. When you are done with your modifications, you
will need to force push your branch with:
$ git push --force origin fix_1
合并
The bugfixing process culminates when one of the project leads decides to merge your PR.
When this happens, it is a signal for you (or the lead who merged the PR) to change the Issue tracker status to “Resolved”. Some issues may be flagged for backporting, in which case the status should be changed to “Pending Backport” (see the Backporting chapter for details).